


Product Description
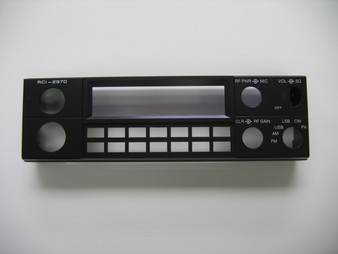
Ranger RCI-2970N2 Assembled Front Faceplate & Keypad Assembly Set
Restore clean control lettering, crisp button legends, a clear optical display, and factory front-panel aesthetics to your high-power 10/12-meter mobile transceiver with this genuine OEM Ranger RCI-2970N2 Assembled Faceplate and Keypad Set. Supplied as a pre-assembled modular refresh package, this comprehensive kit pairs the graphic faceplate overlay with a matched rubber keypad, LCD display lens, and keypad refractor plate to eliminate worn legends, hazing, and tactile wear right out of the box.
⚠️ ADHESIVE WARNING & PROTECTIVE FILM NOTICES
• Adhesive Warning: If any component repositioning or servicing is performed, Do NOT use cyanoacrylate (super glue) types! Outgassing from super glue will permanently fog, haze, and ruin the optical clarity of the LCD display window and lens.
• Protective Film: Peel off all clear protective shipping films from both sides of the faceplate overlay and optical display window before final mounting onto the radio chassis.
Product Specifications & Technical Data
- Manufacturer / Brand: Ranger / RCI (Factory OEM Service Replacement Parts)
- Included Part Numbers / Component Set:
- Graphic Faceplate Overlay: Part # PT2950030B
- LCD Display Window / Lens: Part # PT2950090A
- Keypad Reflector / Refractor Plate: Part # PT2950031A
- Rubber Tactile Keypad: Part # QT2950010A
- Component Designation: Pre-Assembled Front Panel Faceplate, Keypad, Refractor Plate, and Display Window Set
- Kit Format: Factory Assembled Modular Set
- Mounting & Fitment: Direct Factory Chassis Replacement for Ranger RCI-2970N2 front sub-panel layouts
- Quality Standard: 100% Genuine Factory Original Equipment Manufacturer (OEM) Service Component
- Compatible Radio Models:
- Ranger / RCI Mobile Transceivers: Ranger RCI-2970N2 (High-Power 10/12-Meter AM/FM/SSB/CW Dual-Final Transceiver)
Installation & Bench Notes
- Diagnoses & Solves: Faded or rubbed-off front panel nomenclature, chemical-damaged button legends, heavily scratched or hazed LCD display windows, and stiff or worn tactile keypad response.
- BENCH INSTALLATION PROCEDURE:
- Disconnect the 12V DC power cord and antenna coaxial cable from the transceiver chassis. Carefully remove all control knobs, nut hardware, and disassemble the front sub-panel housing.
- Gently separate and remove the old faceplate and worn keypad assembly from the metal/plastic sub-frame. Clean the front mounting surface thoroughly with isopropyl alcohol to remove old adhesive residue, oil, and dust.
- Inspect the Assembled Unit: Verify alignment of the pre-assembled PT2950031A keypad refractor plate, QT2950010A rubber keypad, PT2950090A LCD display window, and PT2950030B faceplate overlay.
- Peel off the clear protective outer film from the faceplate and LCD window surfaces.
- Position the pre-assembled assembly straight back over the control shafts, display window, and button cutouts, pressing it flush against the sub-panel frame.
- Reassemble the front sub-panel housing onto the radio chassis, tighten all hardware gently by hand, reinstall control knobs, and verify proper button travel, tactile click response, and display alignment before powering on.